Appearance
Create hero
Prerequisites
Have an image with several animation frames (movement, attack, etc.).
It is necessary to know
It is not mandatory to have a spritesheet as in the example below. You can create animations from any sprite sheet
1. Create Spritesheet
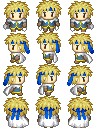
Here is the spritesheet we will use:
- Place the image in
main/client/characters/hero.png(create folder) - Then create the following file in
main/client/characters/spritesheet.ts
ts
import { Spritesheet, Animation, Direction } from '@rpgjs/client'

const frameY = direction => {
    return {
        [Direction.Down]: 0,
        [Direction.Left]: 1,
        [Direction.Right]: 2,
        [Direction.Up]: 3
    }[direction]
}

@Spritesheet({
    framesWidth: 4, // number of frames of the image across the width
    framesHeight: 4, // number of frames of the image across the height
    textures: {
        [Animation.Stand]: {
            animations: direction => [
                [{ time: 0, frameX: 1, frameY: frameY(direction) }]
            ]
        },
        [Animation.Walk]:  {
            animations: direction => [
                    [
                        { time: 0, frameX: 0, frameY: frameY(direction) },
                        { time: 10, frameX: 1, frameY: frameY(direction) },
                        { time: 20, frameX: 2, frameY: frameY(direction) },
                        { time: 40 } // indicate the last time at the end of the animation. This time is in fact the final duration of the animation.
                    ]
                ]
         }
    }
})
export default class Characters {}
Follow the information in the comments
It is important to put
require()because Webpack will retrieve the images and put it in thedistfolder.
Add the spritesheet in the module
Then go to main/client/index.ts, and add the spritesheet in the appropriate property
ts
import { RpgClient, RpgModule } from '@rpgjs/client'
import { HeroCharacter } from './characters/hero'
import { Tilesets } from './maps/medieval'

@RpgModule<RpgClient>({
    spritesheets: [
        HeroCharacter // We add our spritesheet !
    ]
})
export default class RpgClientModuleEngine {}
Preset Spritesheet (optional)
It can take quite a long time to create the animations. Think about creating common functions. For example, if you take a spritesheet compatible with RPG Maker (as above). You can take a RMSpritesheet function
ts
import { Spritesheet, Presets } from '@rpgjs/client'

const { RMSpritesheet } = Presets

@Spritesheet({
    ...RMSpritesheet(3, 4)

})
export class HeroCharacter {}
Parameters:
- framesWidth
- framesHeight
2. Indicate which map to start with and the graphic to use
Open the file rpg.toml and add this:
toml
modules = [
    './main' # folder to load
]

[start]
    map = './main/maps/medieval'
    graphic = 'hero' # filename (without extension)