Appearance
Create an in-game event
Prerequisites
- You have already created a map
It is necessary to know
Events are an integral part of the scenario of your game. You should know that it has 2 possible modes for events:
- The shared mode. The visibility, positions, direction, speed and graph of the event is seen by all players on the map. For example, a monster
- The scenario mode. All features of the event are seen only by the player. Thus, the player can move forward in the scenario without the event affecting other players.
Each event has a life cycle (created, action, contact with a player, property change detection). In the different hooks of the cycle, you can perform commands on a player (or players) like "display a text", "add an item", etc.
Create a character. Shared mode
First of all, add a file in main/server/events/chara.ts
ts
import { RpgEvent, EventData, RpgPlayer } from '@rpgjs/server'

@EventData({
    name: 'EV-1'
})
export default class CharaEvent extends RpgEvent {
    onInit() {
    }

    onAction(player: RpgPlayer) {
       // here, the controls on the player
    }
}
Here we have two hooks:
onInit()is a method called when the event is initialized (put on the map)onAction()is a method called when the player is in contact with the event and presses the Action key (space or enter).
Then in each method, you can make commands, either on the event, on the player concerned, or on a set of players
Position the event on the map
- Go to Tiled Map Editor
- Go to the object layer
- Insert a point on the map
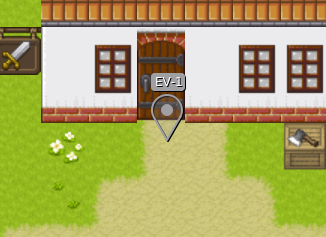
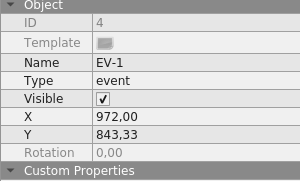
- Set the
eventtype and event name innameproperty
- Go to the
main/server/maps/medieval.tsand add the event in theeventsarray :
ts
import { RpgMap, MapData } from '@rpgjs/server'
import { CharaEvent } from '../events/chara'

@MapData({
    id: 'medieval',
    file: require('./tmx/medieval.tmx'),
    name: 'Town',
    events: [
        CharaEvent
    ]
})
export class MedievalMap extends RpgMap { }
ts
import { RpgServer, RpgModule } from '@rpgjs/server'
import { MedievalMap } from './maps/medieval.ts'

@RpgModule<RpgServer>({
    maps:  [
        MedievalMap
    ]
})
export default class RpgServerEngine { }- reload server: stop
npm run serveans rerun
Example 1: Dialogue with a non-player character
INFO
First of all, add the module @rpgjs/default-gui (if not already in rpg.toml) with the command npx rpgjs add @rpgjs/default-gui
The idea is to put an appearance as soon as the event is initialized.
ts
import { RpgEvent, EventData, RpgPlayer } from '@rpgjs/server'

@EventData({
    name: 'EV-1'
})
export class CharaEvent extends RpgEvent {
    onInit() {
        this.setGraphic('chara') // You must have the chara sprite in the main/characters folder
    }
}
Then, when the player interacts with the event, you are asked to display a dialog about the player.
ts
import { RpgEvent, EventData, RpgPlayer } from '@rpgjs/server'

@EventData({
    name: 'EV-1'
})
export class CharaEvent extends RpgEvent {
    onInit() {
        this.setGraphic('chara')
    }

    async onAction(player: RpgPlayer) {
        await player.showText('Hello World')
    }
}
You have to know that there are several commands, here we just display a text. In fact, it opens a predefined GUI. We use
async/awaitbecause we wait for the player to press Enter after the dialog to continue the other instructions.
Example 2: Example: Earn gold
Here is a more complete example. It shows a small scenario. It is important to know that this event will be seen by everyone. However, the action will be independent to each player :
ts
import { RpgEvent, EventData, RpgPlayer } from '@rpgjs/server'

@EventData({
    name: 'EV-1'
})
export class CharaEvent extends RpgEvent {
    onInit() {
        this.setGraphic('chara')
    }

    async onAction(player: RpgPlayer) {
        if (player.getVariable('GOLD')) {
            player.showText('I already gave you gold!')
            return
        }
        await player.showText('I give you 10 gold')
        player.gold += 10
        player.setVariable('GOLD', true)
    }
}
Example 3: Create a character. Scenario mode
The scenario mode allows you to have events specific to the player. Thus, the graphics, the positions of the event will be different for each player. Beware of performance! The event is duplicated by each player.
ts
import { RpgEvent, EventData, RpgPlayer, EventMode } from '@rpgjs/server'

@EventData({
    name: 'EV-1',
    mode: EventMode.Scenario
})
export class CharaEvent extends RpgEvent {
    onInit(player: RpgPlayer) {
        this.setGraphic('chara')
    }
    onAction(player: RpgPlayer) {
       this.setGraphic('other-character') // The graphics will only change for the player concerned.
    }
}
Set the Scenario mode
Example 4: Modify an event according to an external situation
Let's create two events on the map,
- for the lever
- for the door
main/server/events/lever.tsts
import { RpgEvent, EventData, RpgPlayer } from '@rpgjs/server'

@EventData({
    name: 'Lever'
})
export default class LeverEvent extends RpgEvent {
    onInit() {
        this.setGraphic('lever') // On the client side, you have created a spritesheet
    }
    onAction(player: RpgPlayer) {
        const currentValue = player.getVariable('LEVER')
        player.setVariable('LEVER', !currentValue)
    }
}
When the player presses the lever (with the action key), we set a variable to true / false
You can also change the graphic, to animate the lever (we do not do it here)
main/server/events/door.tsts
import { RpgEvent, EventData, RpgPlayer } from '@rpgjs/server'

@EventData({
    name: 'Lever'
})
export class DoorEvent extends RpgEvent {
    onInit() {
        this.setGraphic('door_closed') // On the client side, you have created a spritesheet
    }
    onChanges(player: RpgPlayer) {
        const isOpened = player.getVariable('LEVER')
        if (isOpened) {
            this.setGraphic('door_opened')
        }
        else {
            this.setGraphic('door_closed')
        }
    }
}
With, onChanges, a listening is done on a potential change. You can then update the door graphics according to the state of the LEVER variable
Note that in MMORPG mode, everyone sees the change of the door graphics even if the variable is changed only for the player. Switch the event to Scenario mode if you want to make a single event per player